
The Interactive Email Forms module creates forms that online visitors can complete and submit. All submissions are sent to designated email addresses.
If you require a new page, refer to Create a New Page.
Select the ‘Edit Content’ button at the top right.
- To edit a form, refer to the different field types below to understand how each functions.
- To build a new form, use the icons described below.
Checkbox:

 Creates a checkbox that users can select or not. More than one selection can be made.
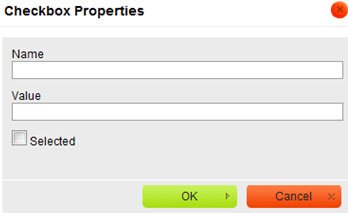
- Select the ‘checkbox’ icon. A Checkbox Properties pop-up will appear.
- Enter the name assigned to this checkbox. (ex. Services Required) Enter the value (option name ex. Pre-arrangement).
- When a form is submitted, the email will display the Name (Services Required) and Value (Pre-arrangement) if Pre-arrangement was selected by online visitor. If multiple checkboxes are created, the name of each one checked by online visitor will be listed in the email.
Use the Selected checkbox if the box will be automatically checked (default).
When complete, select the ‘OK’ button.
Radio Button

 Creates a circle that can be selected from various options. Online visitors can only choose one option.
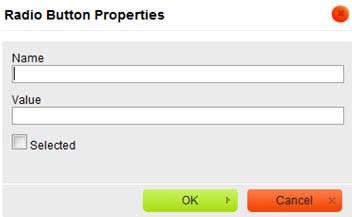
- Select the ‘circle’ icon. A Radio Button Properties pop-up will appear.
- Enter the name assigned to this radio button. (ex. Contact Preference)
- Enter the value assigned to this radio button. (ex. Phone)
- When a form is submitted, the email will display the Name (Contact Preference) and Value (Phone) if Phone was selected by online visitor. Only the value of the one radio button selected will be listed in the email.
Use the Selected checkbox if you would like the radio button to be selected by default.
When complete, select the ‘OK’ button.
Text Field

 Insert a text field in the form.
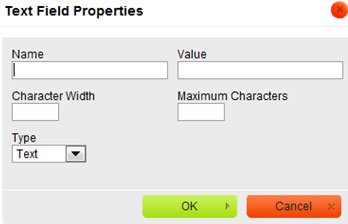
- Select the ‘text’ icon. A Text Field Properties pop-up will appear.
- Enter the name of the text field.
- The value of this field is most likely the same as the name.
- Character Width – Enter the number of characters to define the space required for the text field. If left blank, the text field’s size will be determined by the browser.
- Maximum Characters – Enter the maximum number of characters allowed for the text field. (ex. 10 for a phone number with area code and no spaces.) If left blank, the text field’s size will be determined by the browser.
- Type – use the dropdown to select whether this will be a plain text or password option.
When complete, select the ‘OK’ button.
Text Area

 Insert a multi-line text area.
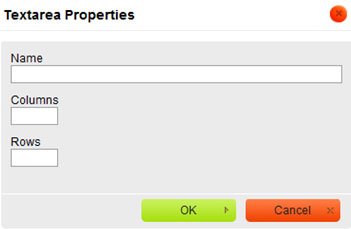
- Select the ‘multi-line’ icon. A Text Area Properties pop-up will appear.
- Enter the name of this text area.
- Enter the number of characters required for the width of the text area. If left blank, the text field’s size will be determined by the browser.
- Enter the number of rows required for in the text area. If left blank, the text field’s size will be determined by the browser.
When complete, select the OK button.
Selection Field

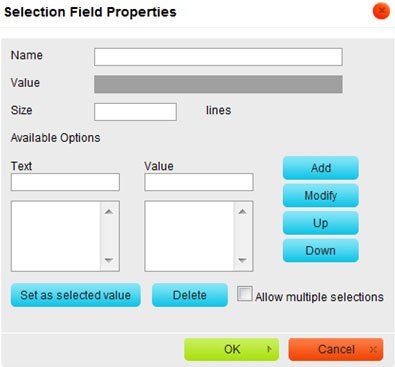 Insert a selection / drop down field.
- Select the ‘selection’ icon. A Selection Field Properties pop-up will appear.
- Enter the name of this dropdown menu.
- The value is name listed in the email sent once form is submitted. This would most likely be the same as the name.
- Size – Enter the number of options to be listed in the drop down menu.
- Enter the text and value of the first item in the drop down menu. The text is the name of the item that will appear in the drop down menu. The value is the name sent in the email.
- Click the ‘Add’ button.
Repeat the above steps until all options are added for the dropdown menu.
- Use the ‘Modify’ button to change the name of an item in the dropdown menu. To edit a listing from the first column, click the name and edit the text within the Text field. To edit a listing from the second column, click the name and edit the text within the Value field.
- Use the Up and Down buttons to change the order of the dropdown items.
When complete, click the ‘OK’ button.
Buttons

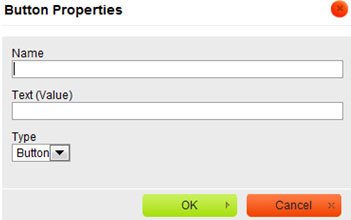 Insert a button into the document form.
- Select the ‘button’ icon. A Button Properties pop-up will appear.
- Enter the name of this button.
- The value will be sent via email and is most likely the same as above.
- Type – use the dropdown to select the button type (submit, reset, etc…).
When complete, click the ‘OK’ button.
After building the form, review the additional information below to ensure the information is correct.
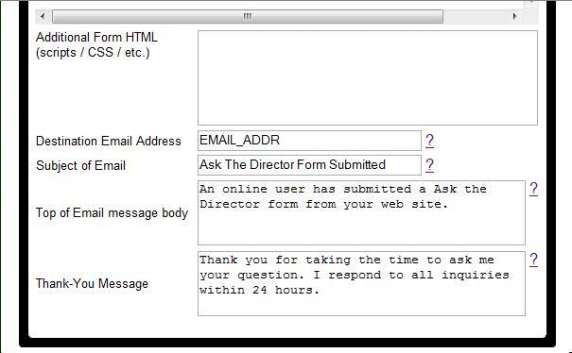
- Additional Form HTML – Add html to enhance the form but only if familiar with html code.
- Destination Email Address – Enter the email address where the form will be sent. If more than one email address is required, separate each with a comma.
- Subject of Email – The subject line of the email.
- Top of Email message body – Add a brief explanation of the email to ensure recipients understand the submitted information.
- Thank-You Message – The automatic reply can thank online visitors who submit forms for taking the time to complete.
When complete, select the ‘Save’ button.
Adding Attachments:
Enter the following code within the Thank-You Message to allow online visitors to attach .jpeg or PDF files with the form submission.

When online visitors submit a form, they will then be asked if there are any attachments. If yes, their email programs will open where they can attach the file.
← Frequently Asked Questions Page News/Newsletter Article Page →
Need more help with this?
Don’t hesitate to contact us here.