
Open a Record > Digital Video Tributes > Print DVD Sleeve and Label.
 This process allows you to print the personalized DVD case sleeves and disc label.
- Step #1 – Use the dropdown to select a theme.
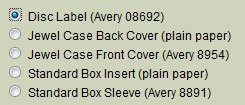
- Step #2 – Select the item to be printed (Don’t forget to load the printer with the correct paper form).
- Step #3 – Select either Preview or Print .
Change Layout or Text
Select Advanced Printing mode: System Settings > Print Engine > Manage DVD Sleeves and Label
This section will allow you to print the DVD Sleeves and Labels for your Digital Video Tributes. We highly recommend that if you want to use your own images, take your sleeves and labels to a local printing company to create for you. Once you have the image on your sleeve and label, you can add it to your system for printing.
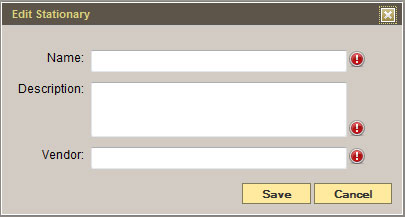
Step #1 – Select the New button.
- Name – Enter the name of the package (group name). Example: You could name a group as Prayer Cards or Remembrance.
- Description – Enter a description regarding this package name.
- Vendor – Enter the suppliers name.
As you type, it will pull a list of supplier’s names you have already entered. If this is a new supplier, two new fields will appear:
Step #2 – When complete, select the Save button.
Once your package is added, you have the ability to add stationery into your package. Select the Edit button.
Step #3 – From the top left, go to File > New or if you are entering into this package for the first time, complete the following fields:
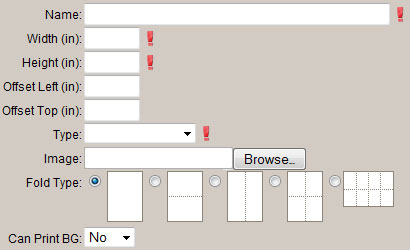
- Name – Enter the name of your Sleeve/Label.
- Width/Height – Make sure to include the width and height of the Sleeve/Label (inches).
- Offset – If you find that once your stationery is printed the fields are not aligned properly, you may adjust the offset (inches), which will adjust the fields to properly align them on your stationery.
- Type – Use the drop down to select the item type you are adding.
- Image – Select the button. Locate the file on your computer and open.
- Fold Type – Choose the fold type for this item.
- Can Print BG – BG stands for background. If you can print the item onto a blank white piece of paper, with the image and information, you can select yes.
Step #4 – When complete, select the Save button. The item will now load on the screen.
Building your DVD Sleeve/Label
When building a sleeve/label, you need to make sure every there is a field where you want information to be printed. This will allow the system to pull the requested information to the area of the form where you have placed a field. To add a field, refer to one of the following fields types to start building:
 Basic Field – This is a field that is straight text. Example: If you need the first name of the deceased, you can search (on the left side) for the word Name or First Name. Please keep in mind that some words may be different in the system than on the form. For example, the field ‘Sex’ is known as ‘Gender’ in the system.
Step #1 – Locate your field from the list and drag it onto the sleeve/label.
Step #2 – The text that appears within the field on the form is exactly where the text will appear when printing.
Drag the field to where you would like to place the text. If you have a section that requires more than one field (ie. First, Middle, Last name of the deceased):
- Add all three fields to the one section
- Group the three fields so they format properly and do not leave any improper spacing. Select the first field, hold the control key down on your keyboard, then select the other two fields.
- Right click on your mouse over the fields and select Group Together.
- You will see a pop up with separators. By default, it will place a space between each field. Otherwise, you have the option to separate with a comma, etc…
- Save.
Step #3 – Click on the field to resize.
The field needs to be resized to fit the enter area dedicated to the information requested on the form. To do this, click on the box that appears in the bottom right corner of the field. This will allow you to expand and reduce the size of the field.
Step #4 – Continue steps 1-3 until you have completed your first row.
When your first row is complete, adjust the alignment so the fields print out in a straight line from left to right. You will need to group all fields in that row:
- Select the first field, hold the control key down on your keyboard then select the other fields.
- Right click on your mouse over the fields and select Align Vertically.
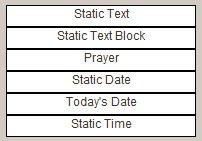 Static Fields – These are fields we have added to provide certain functionality:
- Static Text – Allows you to add a new basic field.
- Static Text Block – Allows you to add a block of text.
- Prayer – Allows you to add a section for a prayer. If you are looking to add a new prayer into the database, please refer to Manage Text/Prayers.
- Static Date – Allows you to quickly enter a date by using a calendar.
- Today’s Date – Allows you to have the printing date auto populate to the form.
- Static Time – Allows you to have the printing time auto populate to the form.
Photo – This will allow the primary picture of the deceased to load on the form.
- Step #1 – Search for the word photo under the All category.
- Step #2 – Locate the field called Deceased – photo and drag it onto the form.
Brand New Field – Allows you to add a brand new basic field. This is used if you cannot locate a field in our library.
- Step #1 – Right click over the section where the field needs to appear and select Add Text.
- Step #2 – The words Static Text will appear on the form. Drag the field to where you would like to place the text.
- Step #3 – Click on your field. The field needs to be re-sized to fit the enter area dedicated to the information requested on the form. To do this, click on the box that appears in the bottom right corner of the field and drag. This will allow you to expand and reduce the size of the field.
- Step #4 – Right click over the field and select Edit.
- Step #5 – The Label is the name of the field.
- Step #6 – Remove the words Static Text and Save.
It will appear as if there is no field there. If you hover over the section, you will see your new field name appear. This will allow an option to add text when you are ready to print your form.
Prayer/Poem – Allows you to insert a prayer/poem that was added to your library.
Step #1 – Right click over the section where the prayer/poem needs to appear and select Add Prayer.
Step #2 – The list of prayers/poems will appear. Click through and select the one you would like to add.
Step #3 – Drag the field to where you would like to place the prayer/poem.
Step #4 – Click on your field. The field needs to be re-sized to fit the enter area dedicated to the information requested on the stationery. To do this, click on the box that appears in the bottom right corner of the field and drag. This will allow you to expand and reduce the size of the field.
There will be formatting options available to all fields. Click on any field and adjust any one of the dropdowns (if option available).

When complete, select the Save button. Once the item is built, it will be available to print within each individual record. This will pull the necessary information from any service and place it on the form.
Need more help with this?
Don’t hesitate to contact us here.