
The Product Catalog module allows you to quickly generate a product page with pricing, special pricing, and more. The header and footer use a WYSIWYG editor to further help create a professional layout that can be edited and updated in seconds. The additional e-commerce functionality will allow you to take online orders. (*Note a third party processor is necessary.
Setting up E-Commerce
If you require a new page, refer to Create a New Page.
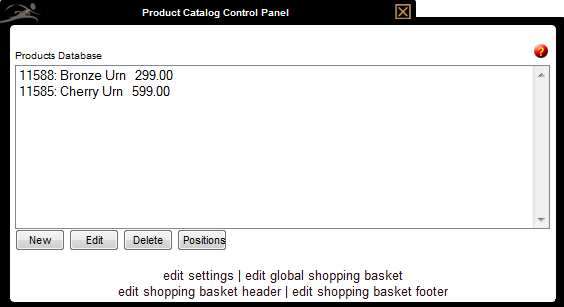 Click ‘Edit Content’ to open the Product Catalog Control Panel.
- New – Add new products.
- Edit – Edit an existing product.
- Delete – Remove a product.
- Position – Change the product order on the page.
- edit settings – Edit the fonts used on the page.
- edit global shopping basket
- edit shopping basket header – Edit the top portion of the page.
- edit shopping basket footer – Edit the bottom portion of the page.
Add a Product ![]()
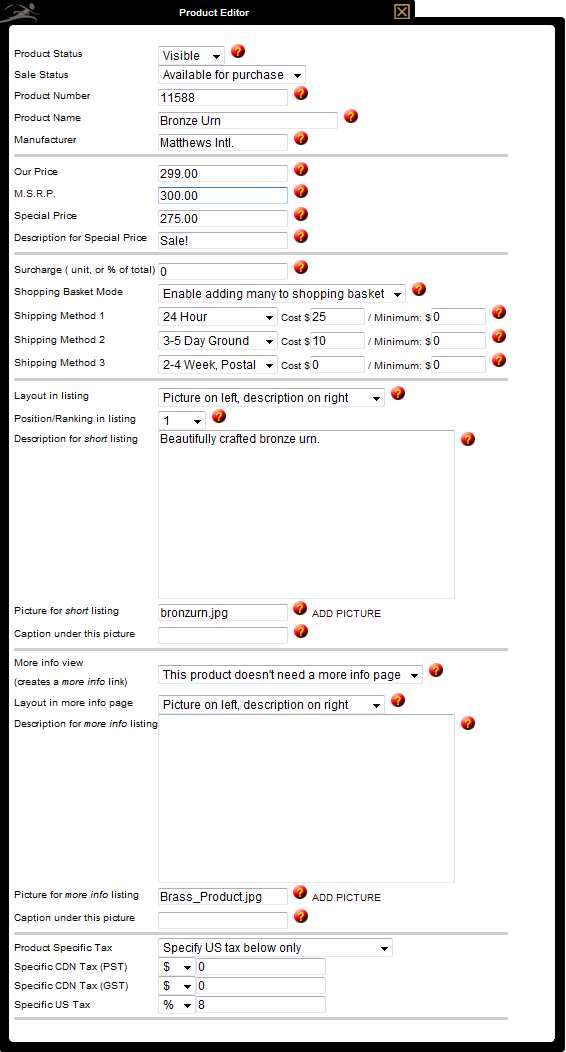
- Product Status – Designate whether products are visible or hidden (hide from online visitors but not deleted from catalog).
- Sale Status – Available for purchase, sold, or sold out
- Product Number – If applicable, as a reference for your online customers.
- Product Name
- Manufacturer (optional)
- Our Price
- M.S.R.P. (Manufacturer’s Suggested Retail Price) – If there is none, leave the field blank.
- Special Price (optional)
- Description for Special Price
- Surcharge (unit, or % of total) – (ex. delivery charges or special handling fees)
- Shopping Basket Mode – Choose whether consumers can add the product to their Shopping Basket.
- Shipping Methods – Choose a shipping method and enter a dollar amount or percentage for shipping costs.
- Layout in listing – Pictures can either be positioned on the left or right of the page.
- Position/Ranking in listing – Defines the order of the products on the page. Position number 1 places the product at the top of the page. If position number blank, the module defaults to the order in which the products are added.
- Description for short listing – A summary of the product’s features.
- Picture for short listing – Smaller pictures are visible when browsing the catalog but visitors can view larger images when they click on ‘more info’.
- To insert a picture for the product summary, ‘ADD PICTURE’. Follow the steps in the ‘Image Gallery Interface’.
- Caption under this picture (optional)
- More info view (creates a more info link)
- Layout in more info page – Determine if the product will be displayed on left or right
- Description for more info listing
- Picture for more info listing – A larger picture can display when web visitor clicks on “more info”.
- Caption under this picture (optional).
- Product Specific Tax – Select how to apply taxes to the product.
- Specific CDN Tax (PST) – Enter the dollar or percentage amount of the tax.
- Specific CDN Tax (GST) – Enter the dollar or percentage amount of the tax.
- Specific US Tax – Enter the dollar or percentage amount of the tax.
Edit Global Shopping Basket ![]()
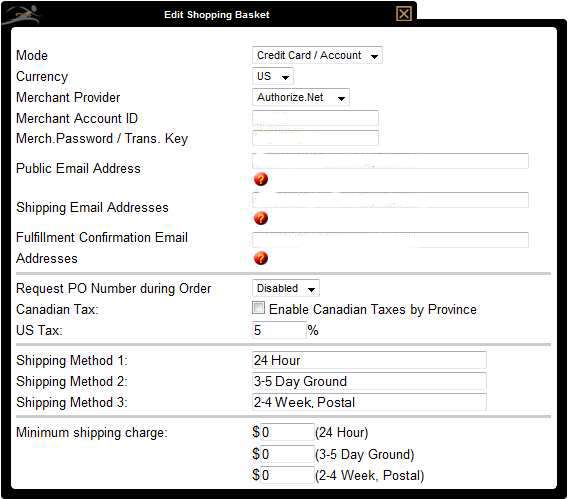
- Mode – By default, credit card is selected.
- Currency
- Merchant Provider – Select the payment processing firm. If you are unsure, please contact the company who provided you a login to your payment processing account.
- Merchant Account ID – This is provided by the merchant provider and contact either numbers or letters and numbers.
- Merch.Password / Trans. Key – This is provided by the merchant provider. You may be given a temporary password in which you will need to change to active your merchant account.
- Public Email Address – This email address will be the one provided to consumer once the transaction is complete.
- Shipping Email Addresses – When the transaction is completed, an email will be sent to the address(es) listed in this field. The email will contain all the information pertaining to the sale. (If multiple addresses, separate with a comma.)
- Fulfillment Confirmation Email Addresses – The shipping email address contains a link to click once the order is fulfilled. (If multiple addresses, separate with a comma.)
- Request PO Number during Order – Enable or disable the option
- Canadian Tax – Enable Canadian Taxes by Province
- US Tax – Enter the percentage of applicable sales tax.
- Shipping Methods
- Minimum shipping charge – Enter the minimum charge for the different shipping methods.
Edit Settings
- Fonts for listing pages
- Fonts for more info pages (if applicable)
- Shopping Basket – Set to Allow Purchases so online visitors can process orders.
- Use Global Email Settings – Check the box to use the same email addresses set up within the Global Email Settings. To use different email addresses, leave the box unchecked and enter the email addresses.
- Public Email Address – This is the email address provided to the consumer after the transaction is completed to contact your firm about the sale.
- Shipping Email Addresses – When a consumer completes the transaction, an email will be sent to the address(es) listed in this field. The email will contain all the information pertaining to the sale. You can provide multiple email addresses, separated by a comma.
- Fulfillment Confirmation Email Addresses – The shipping email address contains a link to click once the order is fulfilled. (If multiple addresses, separate with a comma.)
- Surcharge for Product on Current Page (if applicable)
- Save
Need more help with this?
Don’t hesitate to contact us here.