
Add a Form
System Settings > Print Engine > My Forms > Add new Form ![]()
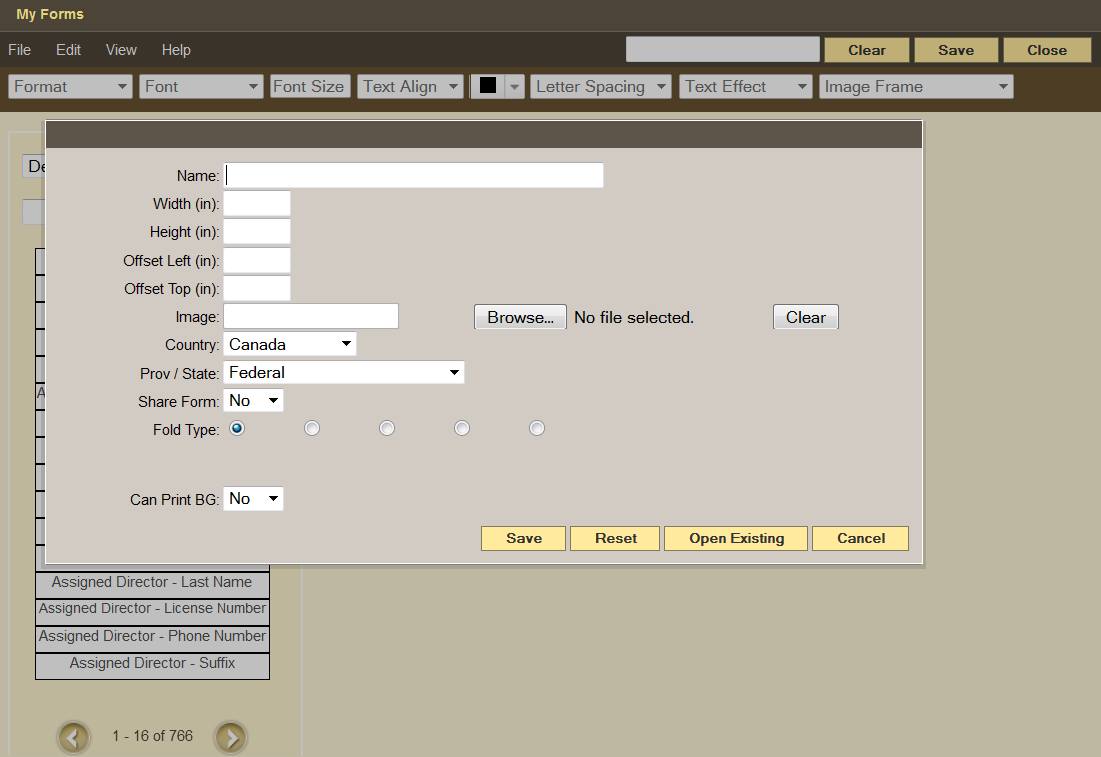
Scan the form so it’s as straight as possible. Save it as a .jpg file. A pop-up will request information; the fields with a* ! *are mandatory.
- Name – Enter the form’s name
- Width/Height (inches)
- Offset – If the form is not aligned properly when printed, the offset can be adjusted in inches to correct.
- Image – Select the Browse button. Locate the file and open.
- Country – If this form is not U.S.A/Canada specific, select Universal.
- Prov/State – If this form is not province/state specific, select Federal.
- Share Form – Share the form with other users.
- Fold Type – Leave on the default option.
- Can Print BG (background). To print the deceased information on a hard copy form (ex. death certificate), then leave as ‘No’. To print the form on a blank white piece of paper with the image and information included, select ‘Yes’.
- When complete, Save. The form will load on the screen.
Reset – Clear the information entered.
Open Existing – Edit a form already created.
Cancel – Closes the window.
Build / Edit a Form
When building a form, every box or section that requires information has a field attached to it. This allows the system to pull the requested information to the corresponding field on the form. Formatting options are available for all fields.

Click on any field and adjust any one of the dropdowns (if option available).
Add Fields ![]()
Refer to the following field types:
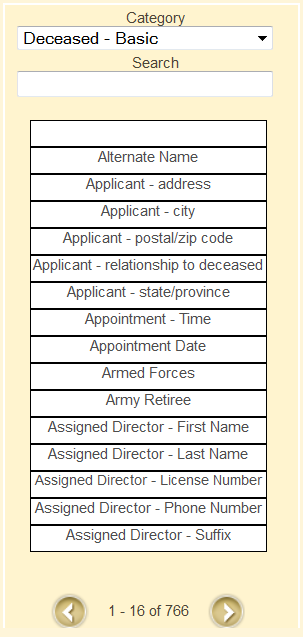
Basic Field – This is a text field. Example: To add the first name of the deceased, search (on the left side) for the word “name” or “first name”.
Note: Some words may be different in the system than on the form. For example, the field ‘Sex’ is known as ‘Gender’ in the system.
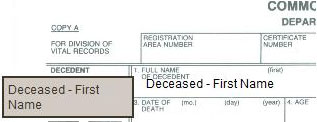
Search for the field to add to the form. Once found, click on it then drag and drop to where it should be located on the form. Where the text appears on the form is exactly where the text will appear when printing.
If a section requires more than one field (ie. First, Middle, Last name of the deceased):
- Add all three fields to the one section
- Group the three fields to ensure they format properly without leaving any improper spacing. Select the first field, hold the control key down on the keyboard and then select the other two fields.
- Right click over the fields and select Group together.
- A pop up with separators will appear. By default, it will place a space in between each field. There will also be an option to separate with a comma.
- Save.
The field needs to be resized to fit the designated area on the form. Click on the field, click on the box that appears at the bottom right corner of the field, and expand or reduce the size of the field.
*Checkbox *- Add a check mark to a checkbox. Example: For gender, it may ask to check which gender (male or female). 
- Locate the field from the list and drag it to one of the checkboxes.
- Right click over the field and select Convert to X mark.
- Select the option for that particular check mark.
- An “x” will appear and can be moved to the box on the form.
- Follow the same steps until all check boxes are complete.
Static Fields – These fields provide certain functionality:
- Static Text – Add a new basic field.
- Static Text Block – Add a block of text.
- Prayer – Add a section for a prayer or poem. (To add a new prayer to the database, please refer to the Manage Text/Prayers section.)
- Static Date – Enter a date by using a calendar.
- Today’s Date – Printing date will auto populate the form.
- Static Time – Printing time will auto populate the form.
- Photo – Load the primary picture of the deceased on the form. To add a photo, search for the field called “Deceased – photo”. Drag and drop the field on to the stationery.
Add a Custom Field
If you are unable to find a field within the library, add a new basic field.
Right click over the section where the field needs to appear and select Add Text. The words ‘Static Text’ will appear; drag the field to where it needs to be located on the form. To resize the field to fit the designated area, click on the field and then the box that appears at the bottom right. Expand and reduce the size of the field to fit within the section. Right click the field and select Edit.
The Label is the name of the field that will appear when searching. Remove the words ‘Static Text’ and Save.
When complete, Save.
Align Fields
Once all fields are added, the row of fields can be aligned to print in a straight line from left to right as well as at a single left margin. This can be accomplished by grouping the fields.
- Align a Row – Click the first field, hold the control key down on the keyboard, and click the other fields in the row. Right click over the fields and select Align Top Edge.
- Align a Column – Click the first field, hold the control key down on the keyboard, and click the other fields in the column. Right click over the fields and select Align Left Edge.
When complete, Save.
Once a form is built in the My Forms section, hover over Edit to select ‘Edit’, ‘Delete’, or ‘Copy’.
← Print / Edit State, Provincial & Federal Forms Print Forms →
Need more help with this?
Don’t hesitate to contact us here.